HUNTING ASTEROIDS By Bruce Mellin, Brooks School, N. Andover, MA This activity is a general introduction to asteroid exploration and image processing using MicroObservatory images of the asteroid Pallas. You will access the images from a separate folder (SEE LINK AT THE BOTTOM OF THIS PAGE), and learn how to image process them to locate the asteroid. Background: On January 1, 1801, Giuseppi Piazzi discovered the first asteroid. Ceres remains to this day as the largest asteroid in our solar system with a diameter of 623 miles. (1003 km) Since 1801, more than 5,000 asteroids have since been discovered by both amateur and professional astronomers. An asteroid, is a chunk of rock orbiting the Sun with a minimum diameter of 30 feet (10 meters). There is a growing body of evidence indicating that an asteroid much smaller than Ceres struck the Earth about 66 million years ago. The energy released by the impact of this 10 mile-wide asteroid was enough to destroy much of the life on the Earth, including the dinosaurs. Luckily for us, Ceres and many of the larger asteroids have almost circular orbits that keep them safely between the orbits of Mars and Jupiter. There are several dozen ateroids with orbits that, on occasion, cross the Earth's orbit. These are called the Apollo asteroids and should be watched carefully. Since astronomers anticipate a future encounter with an asteroid, we should search for new asteroids and moniter the orbits of the known asteroids. Pallas, the second largest asteroid is hiding somewhere in the two images you are about to process. The skills that make it possible to detect Pallas in this activity are the same skills that you will use when sluthing for asteroids in images that you will obtain with the MicroObservatory Telescope. The Goals of this activity will be to understand: a. how to detect the presence of asteroids and other moving objects in an image. b. how to Open NIH image files. and use the Save and Save as file commands c. how the Edit/Undo and File/Revert to Saved commands operate. d. how the Magnifying Tool Ř is used to investigate an image. e. the term noise and how image processing removes noise from an image f. how the Stack and Register commands are used to locate asteroids Procedure 1. Open the NIH Image Processing program. Use the File/Open menu choices to locate the Hunting Asteroids Folder. Open the folder and open both image of Pallas. SEE LINK TO IMAGES AT THE BOTTOM OF THIS PAGE 2. Use your mouse to pull down the Windows menu. Note that the names of the two files just opened are at the bottom of this menu. How can you tell which file is in the active window? (The active window is the window that the program will change, based on image processing commands the user chooses) 3. The following questions can be answered while viewing either image. a. Each image is a record of energy collected by the MicroObservatory Telescope. The amount of light that falls on the imaging surface inside the MicroObservatory varies. The varying levels of light forms the digital image you now see on the computer screen. Digital images are made from thousands of small pixels or picture elements. Choose the Magnifying Tool . Place the tool on any image object. What happens to the pixels with each "click" of your mouse? b. What happens to the + inside the ŘMagnifying Tool when the ľ key is depressed? c. Magnify "in" as far as possible. Describe what you observe. d. What happens to the image at this maximum magnification if the Ř Magnifying Tool is DOUBLE CLICKED" e. What information does the image tell you about this area of the sky observed with the MicroObservatory Telescope? f. What kind(s) of sky objects have been recorded in either of these images ? g. Can you think of any way that you could use the information in the two images to distinguish between stars and moving objects ? If yes, Explain your reasoning. 4. Digital images can contain a great deal of noise. Noise is energy that was not collected by the telescope and should not be part of the image. Noise results when heat and stray energy that surround the telescope collect on the imaging surface inside the telescope. Image processing can subtract some of this unwanted energy. Use your mouse to access the Process/Rank filters menu. The Median (Reduce Noise) button should be black. One(1) iteration (one pass across the image) is usually sufficient to eliminate much of the noise from the image. Click OK and carefully observe how noise reduction changes the appearance of the image. Note: Use the Edit/Undo Menu choice if you are not satisfied with how the image looks after noise is removed. Undo only works to reverse your last command. File/Revert to Saved will also restore the image with the image data that was part of the last Save procedure. It is a good idea to give an image a new file name with the File/Save as... command. Save replaces the original file data with any changes you may have made to the current screen image. Save as allows you to create a new file. This preserves your original image file. Saving images frequently is good insurance against crashes and program freezes. Describe how the image changes when noise is removed. Reduce noise in both images before continuing. Why is it important to reduce the noise in an astronomical image ? 5. The process you are about to learn is termed blinking. This was the process used in 1930 to discover Pluto. When two images are "blinked'" stars remain in place as the images are alternately flashed on the screen. Orbiting solar system objects like planets or asteroids will betray their locations by shifting with respect to the fixed positions of the stars, The following requirements should be completed before continuing: a. both images should be processed and saved. b. both images should be open c. both images should be the same size (MicroObservatory images are always the same size. Make sure that you do not alter the size of an image during processing!) Use your mouse to click the Stacks Menu.... How does the name of the file along the top of the active window change when you highlight and then release on Stacks/Windows to Stacks? 6. The two images are now in a Stack. Animate your stack by highlighting Stacks/Animate. Animation quickly activates each image in turn, fooling your eye into thinking that motion has occurred. The images are alternately blinked on your screen. All motion pictures operate like this except that here you are only watching two images blinking on the screen. Motion picture "blink" millions of individual images to produce the illusion of motion. The number keys can be used to control the speed of your animation(blinking). (1 is slow ....9 is fast) The blinking can be stopped by clicking anywhere on the screen. You may also use < or > keys to blink between stacked images and investigate if anything has moved between the times that the two images were acquired. Describe what you see as the two images are blinked. Can you see anything that might be an asteroid? If yes...then explain your reasoning. 7.. Save your stacked images with a new file name. Pull down on the Stacks menu to the Register command. Follow the instructions carefully. If the registering process does not work properly, you can close the stack and open your saved file and try again. Note: Fiducial points are simply locations or objects that are common to both images. You might want to use the < or > keys to carefully look at both images for similarities that could be used as fiducial points. The images are registered when most objects remain in place when blinked. Asteroids give themselves away by shifting posion. Describe how Stacking and Registering aids in the detection of asteroids. Can you describe the location and movement of the asteroid Pallas in these images?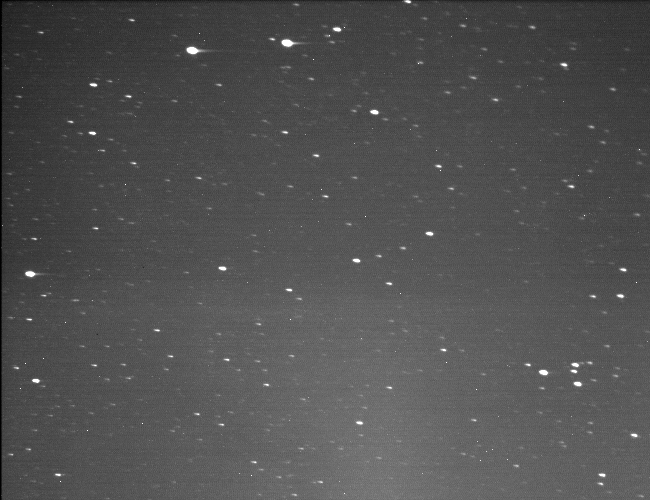
Activities Page